In this entry I will explain how to leverage Docker technology to build a continuous integration system that will monitor your source code repository, build your product, pass the tests, audit automatically the code with SonarQube and leave the binaries ready to download.
In a classic scenario we would have a few virtual machines doing all those tasks, but with Docker you can go to a scenario where we distribute the tasks in different containers instead of virtual machines, resulting in a much lighter environment, easier to scale and easier to migrate. Before I continue, I want to make one thing clear , in this blog post I will not explain you how to “dockerize” applications, I will do it another day 🙂
Our continuous integration environment will be composed by:
- A Jenkins “master” container which will orchestrate the tasks
- One or more “agents” containers (also known as “slaves”), which will carry out the tasks
- An automatic code analyzerin a SonarQube container
For this tutorial I will use Docker Toolbox for Windows with the Docker QuickStart Terminal console. Commands are the same if you use Docker to other platforms.
A master to rule them all
If you’ve ever used Jenkins, you should know that ther is usually a master node that contains tasks configurations and it’s on charge of launching the tasks or “jobs”. The are several “agents” nodes (also known as “slaves”) which run those tasks.
Well, let’s go for it …. In the console where you have Docker installed type:
docker pull jenkinsci/jenkins: lts
This will download the image with the latest version of LTS (Long Time Support) Jenkins.
Start the container:
docker run --name jenkins_master -p 8080:8080 -p 50000:50000 -v jenkins_home:/var/jenkins_home jenkinsci/jenkins:lts
A little explanation on this command:
- Puts a name to the container: jenkins_master
- Publishes ports 8080 and 50000
- Mounts a volume into the folder var/jenkins_home of the HOST (external to the container), where the configuration and the results of the tasks are stored. If you do this way, if the container is destroyed, information will not be lost.
Now, if you access with your favourite browser to http://IP_DEL_HOST:8080, you will see this beautiful screen:
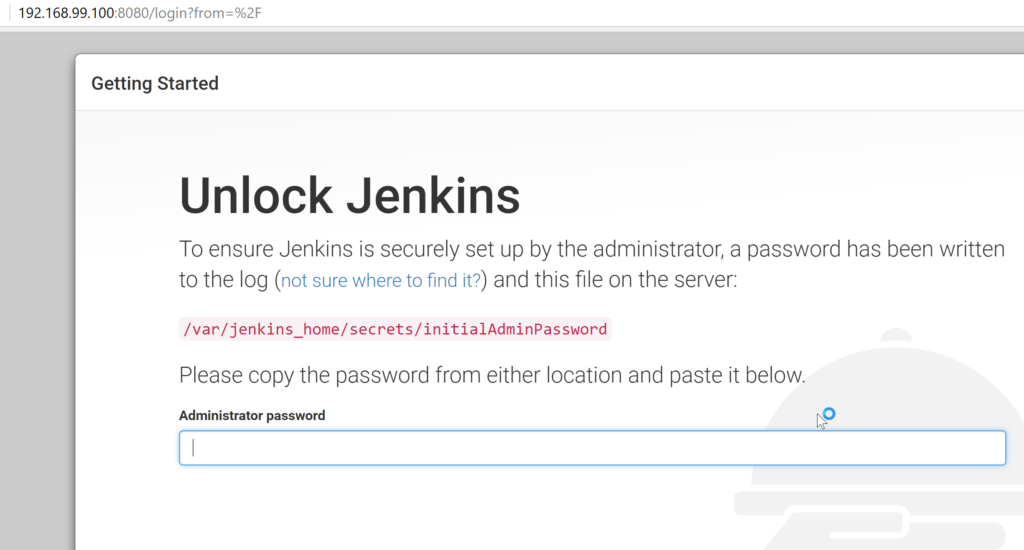
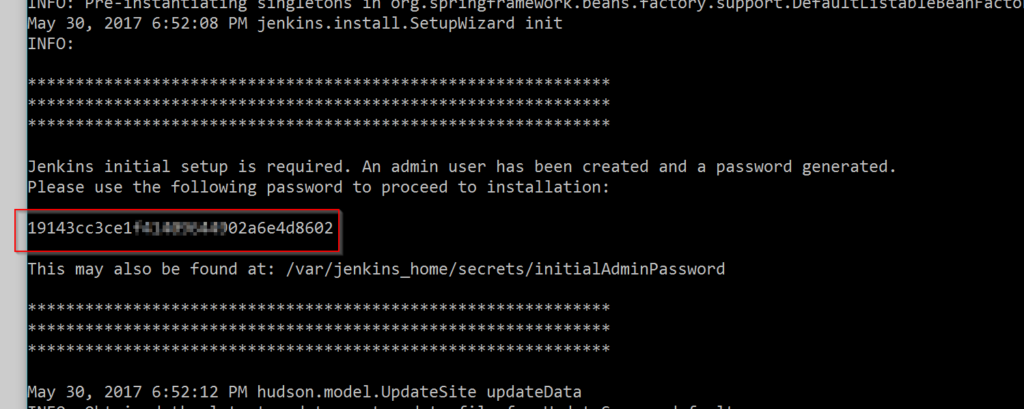
The initial password will be visible in the console or in the file /var/jenkins_home/secrets/initialAdminPassword
Just type the key and continue with the Setup process:
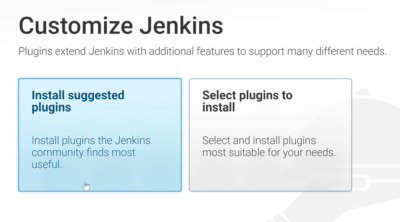
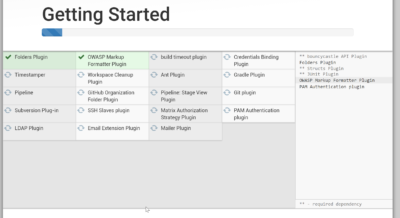
For now, choose the default option “Install suggested plugins”
OK, you’re almost done, you just need to create an administrator user: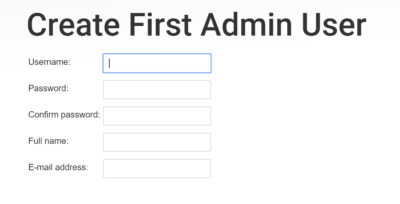 Now you should see the Welcome screen:
Ahh, our old “Hello World” friend
To do a quick test to see if Jenkins works, go to “New item” to create a new job:

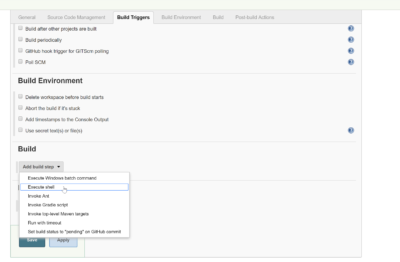
At section “Build“, please click in “Add build step” and select “Execute Shell”
And type:
echo Hello World
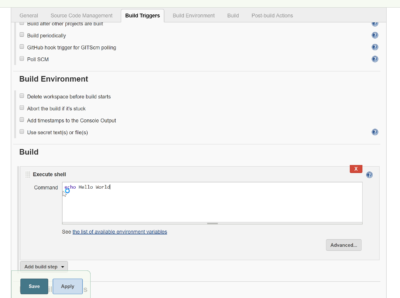
And now “Save” and “Build Now“. After a while you will see the build number:
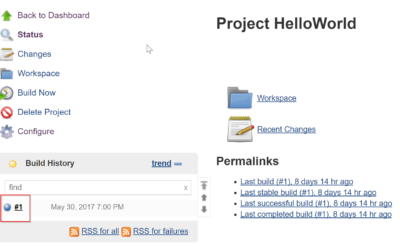
Click in the number and click “Console output”
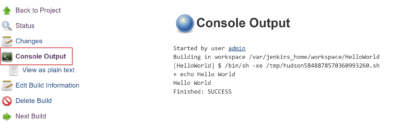
Congratulations! You have executed “something” with Jenkins. Later, you will run “something useful” with a real world example. But first…
Agents, slaves and nodes
In the previous section you started a master of Jenkins which is able to run tasks. While this is fine, it isn’t a real scenario. Continuous integration systems typically have a master (or several ,on very large systems) that coordinates work and some agents that are in charge of actually executing that work.
It is common to find the word slaves (slaves) or nodes (nodes) to refer to agents. In Jenkins world, these concepts are synonymous, I will refer to them as agents, you can check the latest versions of Jenkins documentation for more information.
Connecting an agent is done in two sides: you must register it in Jenkins and then connect it using a compatible protocol such as SSH or JNLP or others.
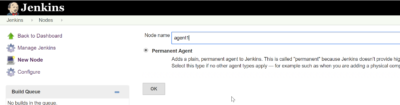
No more talk and let’s do it. Click on “Manage Jenkins” and “New Node“:
Give it a name, for example “agent1” and OK
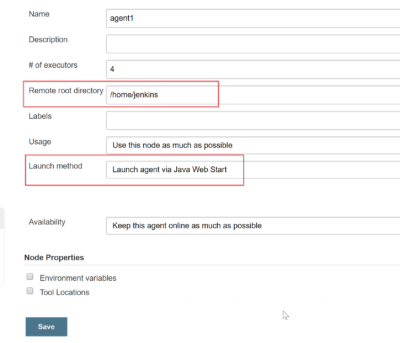
On this step make sure that:
- Remote root directory: /home/jenkins
- Launch method: Launch agent via Java Web Start. There are other methods to connect as SSH, but for this example we’ll use JNLP
And…. “Save”
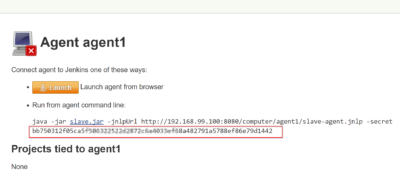
With these steps, you’re saying toJenkins that you’re going to connect a new agent. You need a secret token to authenticate the connection. It is shown after the -secret parameter:
Veeeery well. We continue. The Jenkins DockerHub repository has an already configured image to run an agent. This image has OpenJDK installed too, so it will be able to compile and run Java projects.
This command will download the image:
docker pull jenkinsci/jnlp-slave
Start the container:
docker run --name jenkins_agent1 jenkinsci/jnlp-slave name -url http://HOST_IP:8080 YOUR_SECRET agent1
- It names the container as: jenkins_agent1
- At HOST_IP, just type your Jenkins server address, as you type it on the browser
- The next parameter is the secret token Jenkisn provided you in the previous step
- The last parameter is the name of the agent. In your case agent1
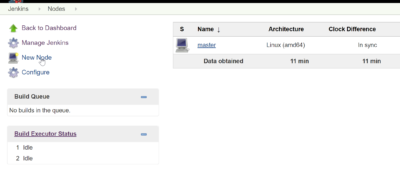
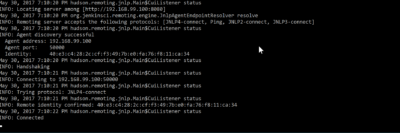
If all goes well you’ll be seeing something like:
At Jenkins control panel you will see that the agent is connected and the number of “executors” it has. For now, it will be “Idle”, it is not running anything. 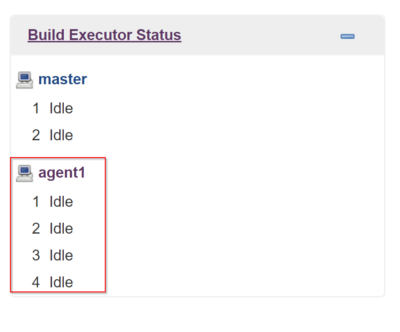
The build gets serious
So far we have not built anything useful, but we already have a master and an agent ready to start working for us. We are going to build a real project. For this tutorial I have chosen the FitNesse project. Fitnesse is a wiki-like collaboration tool and an acceptance testing framework. It’s open source, it is written in Java and is built with gradle.
The original source code is at https://github.com/unclebob/fitnesse. To continue with this guide I recommend you to do a fork of https://github.com/jaruzafa/fitnesse_CI_DEMO, which is a clone of the original (with some changes that we will see later) that I keep frozen for this tutorial, so if the original project changes substantially in the future, the steps of this tutorial, will continue to work you.
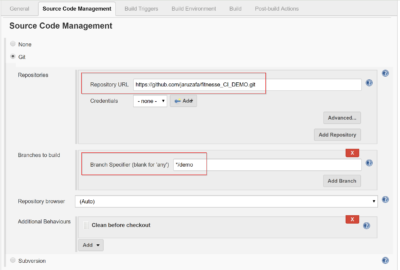
OK, let’s rock´n´roll. At Jenkins Panel go to “New Job” and select “Freestyle Project“. Write an original name as “FitNesse”. It will take you to the Setup screen. In the section “Source Code Management” type the repository where you have your project’s source code.
- Repositories: In my case I have https://github.com/jaruzafa/fitnesse_CI_DEMO but if you have made a clone, write your repository address.
- Branches to build: * /demo
- Although it is not strictly necessary for this example, in my projects I use to add an “Additional behaviour”-> “Clean before checkout”. In this way, I am sure that there are no “leftovers” of previous compilations or tests and you’ll always build your product from “scrath” (as it is in your repository), although it takes a little more time.
 PSS: If you are a Jenkins pro, you might wonder why I do not use the GitHub plugin for this project. In this example I want to illustrate how to connect with any Git repository regardless is GitHub or another.
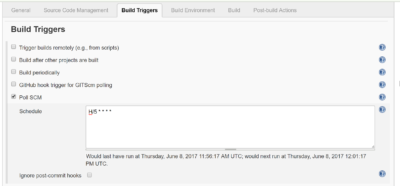
Let’s go to “Build Triggers” section. Here you’ll set what event “triggers” the build.
- Select “Poll SCM” and write H/5 * * * *
- This tells Jenkins to “ask” your repository every 5 minutes if there are changes. If there are any, trigger the job.
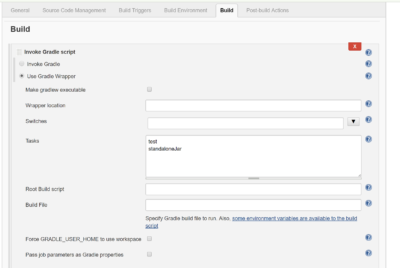
 In the “Build” section is where all happens.
- Click on “Add build step” and select Invoke Gradle Script
- Select “Use Gradle Wrapper” for this project.
- In the section “Tasks” write test and standaloneJar. This will run the unit tests and generate the jar binary.
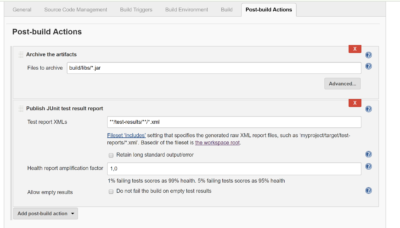
And finally, to have a report with the test results and to let Jenkins store the .jar, you’ll set two “Post-build actions“:
- Archive the artifacts
- Archive files to: build/libs/*.jar
- This will store the jar in Jenkins. In larger systems, binaries are usually stored in external repositories dedicated for this purpose (such as Nexus, Artifactory, etc.), but for this example it’s ok.
- Publish JUnit test result report
- Test report XML: **/test-results/**/*.xml
- Here, you are telling Jenkins where to find the xml files that contain the JUnit test results
One more thing… run the job!
You can run the job in two ways:
- Manual: Click on the “Build Now” button
- Automatic: As you set earlier, you said Jenkins to poll every 5 minutes your Git repository to check for changes. Just commit something in your repository and wait until the build triggers. Remember, you must commit on the same branch you provided in the section “Source Code Configuration” (in my case is the “demo” branch). This is a common way to start a job in a continuous integration environment, but there are others.
As soon as you start the job you’ll see this:
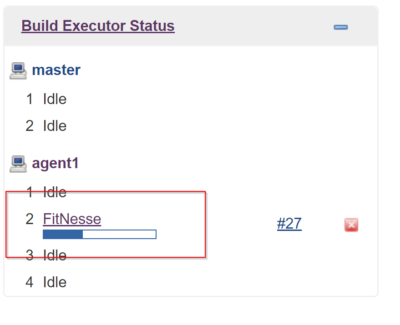
Wait for a while and you will have something like this:
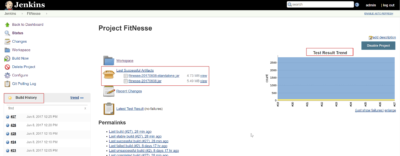
At the left column you’ll have your build history. In the center, you’ll have links to the generated jar (which you can download!) and the junit test results. When the job have several runs, on the right side you will get a graph with the test result trend. It is beyond the scope of this post to explain each option, so I encourage you to explore and take a look at the Jenkins documentation.
Code inspection
In real world continuous integration systems, as well as compile and run tests, it is common to perform automatic code audits and code coverage. This example will show you how to connect SonarQube (a very popular open source tool) to your continuous integration system. Of course we will continue using Docker 🙂
The SonarQube team has kindly prepared a series of ready to use images. Download the image with:
docker pull sonarqube:lts
And start it with:
docker run --name sonarqube -d -p 9000:9000 -p 9092:9092 -v sonarqube_home:/opt/sonarqube/data sonarqube:lts
A little bit of explanation of this command:
- It names the container as sonarqube
- -d: starts the container in ‘daemon’ mode
- -p 9000:9000 – p 9092:9092: publishes ports 9000 and 9002
- -v sonarqube_home: / opt/sonarqube/data: mounts a volume where to sotore the data out of the container. This is needed because if the container is destroyed you would lose all the information.
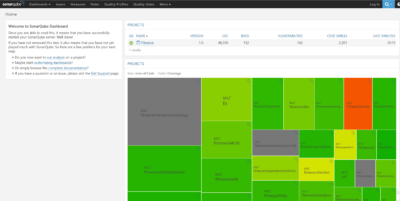
Let’s make sure that SonarQube is up running. With your browser, go to http://HOST_IP:9000 (beware of the port!), you should see:
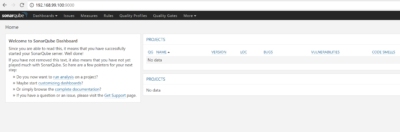
You need to install the Java plugin. Click on the “Log In” link, the default user and password are admin / admin. Now, go to “Administration”-> “System”-> “Update Center”-> “Available” and look for “Java“. Click on install and it will restart the service.

Oook. We have just a container with SonarQube and it has the Java plugin insatalled. We must tell Jenkins where it is. By default, Jenkins does not have the SonarQube plugin installed, so let’s install it.
Go to Jenkins control panel, click “Manage Jenkins” and click on “Manage Plugins” :
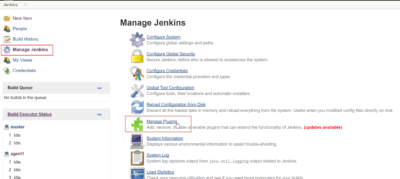
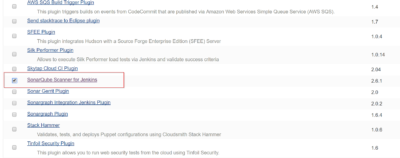
Now go to “Available” tab and look for “SonarQube Scanner for Jenkins” and “Install”
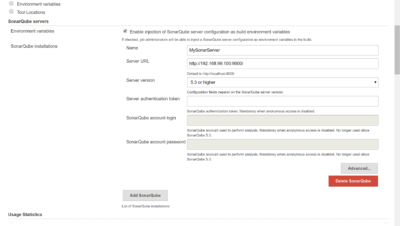
You must tell jenkisn where is your SonarQube server and what Scanner to use. So, go to “Manage Jenkins” and “Configure System“. Look for the SonarQube Servers section and click on “Add SonarQube“. Just fill in the fields Name (give it a descriptive name) and Server URL, like http://HOST_IP:9000. I attached a screenshot of my setup:
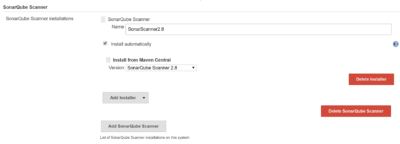
You need to tell Jenkins what Scanner you will use. This is done via “Manage Jenkins” and “Global configuration tool”. Look for the “SonarQube Scanner” section and click on “SonarQube Scanner installations” and “Add SonarQube Scanner”. Type a descriptive name, and let Jenkins to install the needed software cheking “Install automatically”. This is one of the things that I like of Jenkins, just delegate on it to be in charge of installing the tools when you need them, freeing you of agent nodes maintenance.
So far so good. Jenkins already knows where is SonarQube Server and what Scanner is going to use, but our job doesn’t know yet. We will continue with the FitNesse example. In order to make the code analysis and to get the unit test code coverage, we need to do two things: a file named project-sonar.properties and activate the JaCoCo plugin in build.gradle to get the code coverage information.
In build.gradle file add this line after the plugins block:
apply plugin: "jacoco"
This prepares the project to save coverage information when you run the tests.
In addition, SonarQube needs to know some things about your project. Create a file named project-sonar.properties with this content:
sonar.projectKey=my:Fitnesse
sonar.projectName=Fitnesse
sonar.projectVersion=1.0
sonar.sources=src
sonar.exclusions=**/*.min.js,src/**/bootstrap.js,src/**/codemirror.js,src/**/jquery.tagsinput.js
sonar.tests=test
sonar.java.source=1.7
sonar.java.binaries=build/classes
sonar.java.libraries=lib
sonar.jacoco.reportPath=build/jacoco/test.exec
You can find the meaning of each field it in the SonarQube documentation, but we are basically telling it where to find the sources, some exclusions, where binaries are generated, and where is the coverage information located.
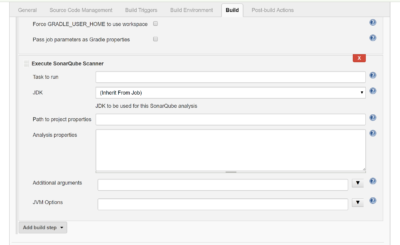
Let’s setup the job to perform an analysis with SonarQube. Go to the job that you’ve created in the previous section and click “Configure“. Go to “Build” and “Add Build Step” and add “Execute SonarQube Scanner“.
Save the settings and hit “Build Now” to test that all is ok. In a few minutes you should see:
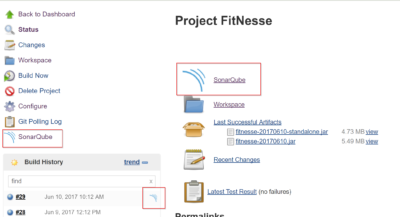
You’ll see a new link to the results of the SonarQube coverage and code analysis. Click on the link and it will take you to the SonarQube results page:
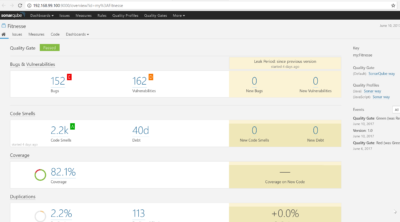
I encourage you to read the SonarQube documentation and explore it.
You got it! You’ve built a continuous integration environment with a real world project.
Turning it on and off
Docker provides some commands to control the containers life cycle. If you have not worked before with Docker these is that you need for this tutorial:
List containers that are currently running:
docker ps
List all containers, even those that are stopped:
docker ps -a
Stops the specified container. You can pass the id of the container or its name. If you pass the id, you can tell only the 3 or 4 first characters rather than full id string.
docker stop id_or_name
Example:
docker stop sonarqube

docker stop ab12
Starts the specified container, you have previously stopped it with a docker stop.
docker start identifier or name
We could automate this stuff using Docker compose too.
I hope you enjoyed this guide! I love to read your comments.
Awesome post ! Screenshots + explanations at every stage, what more could you want